Guide #3: TRACK
Data Entry and Management
Integrate into your existing workflows. Note that there is a companion Excel Workbook for this unit.
Once surveys are administered, customers are counted, and vendor forms are returned, what do you do with all that information?
How well you manage data makes the difference between messy stacks of paper that hide your valuable information and a handy reference that you can always turn to for quick answers to questions. Data management is the process of consolidating cleaned-up data into one computer file (often a spreadsheet), where data can be stored and then analyzed.
As technology advances, mobile apps and other software have begun to offer inexpensive options for onsite data collection, which eliminate the need for separate data entry back in the office. Some data collection systems already utilize mobile data collection, with apps specially designed for a given project. Spreadsheets can be downloaded later for analysis, where graphs and tables can be created.
Common structures for entering and managing data at farmers markets include online tools like Manage My Market, Formstack, and products like Microsoft Access or QuickBooks (for financial accounting). Customized spreadsheets created using Excel or Google Spreadsheets are also common. These files can be integrated with free online form-builders like Google Forms that allow markets to collect and enter information directly from vendors, visitors, or community partners.
But regardless of when and where the data is entered, creating the best structure for data management is a critical first step to developing a reliable storehouse of information for quick reference, more detailed analysis, and comparison across years.
The complete version of this form can be accessed here within the resource library on this site.
Since the data is exported from most of these tools into spreadsheets, you will need a basic familiarity with Excel spreadsheets, even when only using online tools. If you are unfamiliar with Excel, there are many quick tutorials online that outline the basics.
Excel allows graphs and charts to be created from its worksheets for reporting the data later on.
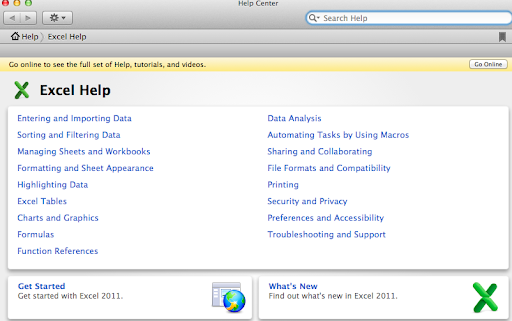
Excel’s Help menu (which will vary based on operating system and version), shown in Figure 3.2, provides simple instructions for its use:
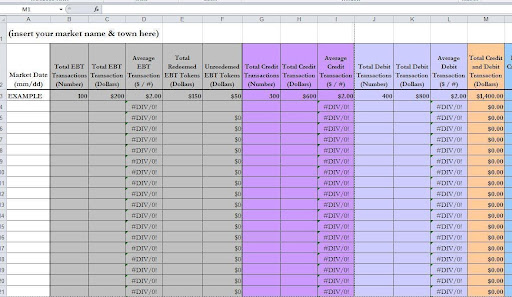
Here’s an example of how markets can use spreadsheets to manage data: Washington State University (WSU) worked with a CPA to develop a series of optional tools to improve data management for 15 markets participating in an EBT pilot program funded by a Washington State Specialty Crop Block Grant. Figure 3.3 below is the “Market Day Transaction Summary Report,” created from an accounting template WSU shared with participating markets.
This template, which can be downloaded here, is one example of a spreadsheet designed to track nutrition assistance and incentive transactions and to aggregate data throughout a market season.
In place of a single dynamic platform that can manage ALL of your market’s unique data needs, you can reliably use a series of spreadsheets with built-in formulas that can be modified as needed for entering and safely storing data.
Creating a Database
Creating & Labeling Tabs
Creating separate worksheets (aka “tabs”) in an Excel data file (aka “workbook”) will enable you to organize your data effectively. Label each tab with NO spaces between words: use “VendorSales” or “Vendor_Sales,” with an underscore between words. While Excel will permit you to place spaces in worksheet names, those spaces can present problems later on, when you create formulas that refer to cells across different tabs. Please note: we use spaces in tab names in the text of this unit to maintain readability.
Removing Duplicate Values
A common step in preparing data is searching for and removing duplicate entries. If you create an ID number that uniquely identifies each respondent (whether a vendor or a visitor) in the dataset, you can then sort the data by ID number to check if any number shows up in adjacent rows. If so, the rows should be compared to verify that they are identical and then one of the identical rows can be deleted.
Here’s a simple technique to deal with duplicate entries: In any given spreadsheet, create a leftmost column (Column A) labeled “ID #” and use it to assign each row in that spreadsheet a sequential ID number (1,2,3, etc.). This way, it will be easy to identify gaps if a row was either accidentally or intentionally deleted. This technique will also link each row with whatever paper instrument contains the original data, in case you need to find it later. Be alert about numbering properly (not skipping or duplicating in the sequence) when creating IDs. It may be best to use an Excel function or formula for this task, such as the Automatically Number Rows function.
Adding Comments to the Data
You can add notes to cells by selecting Insert > Comment or by showing the Reviewing toolbar. Cell comments can be used to draw attention to areas of question or to leave a note for another data collector using the database. These comments are separate from the data entered within the cells and have no influence on any computations.
Comments can be shown or hidden depending on your preference. Comments can be added to the heading cells (usually the first row of a worksheet) to document any math or formatting actions taken. Cell comments can also be added to flag redundant rows of data omitted from the final dataset, or to make note of where whoever was entering data left off before saving so that they (or another data collector) can easily pick up where they left off.
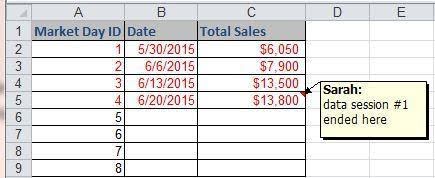
Figure 3.4 below shows an example of how you can add comments to define each entry session:
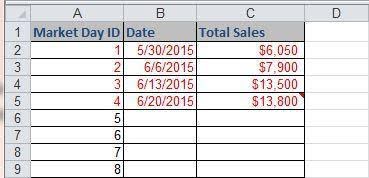
In Figure 3.5 below, you see the same screen, but with the comment hidden:
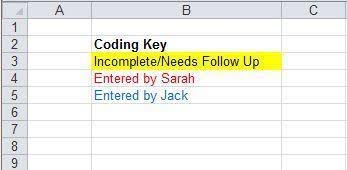
color according to a coding scheme that is described in a “key” tab (Figure 3.6). This key reminds users (including you) how to interpret different colors, italics, or bold text. This multicolor technique makes it easy to create a dataset that anyone can review at any time and quickly understand.
Additional Tips
This rule bears repeating to everyone on the data collection team: Always save a backup of the database.
You can reduce the chances of losing entire documents by setting the AutoRecover function in Excel and Word. Under File > Options > Save, make sure there is a check mark next to Save AutoRecover information every X minutes (10 minutes is normal for most document retention), and a check mark next to Keep the last AutoSaved version if I close without saving. If a great deal of data entry is to be done at one time, setting up more frequent AutoRecover is a good idea.
If you do not have automatic cloud backup, email yourself (as well as other key members of your data collection team) a copy of the file at least once a week.
For additional tips that will help you feel more comfortable working with a spreadsheet (especially in Excel), refer to the guide, “Using Excel for Analyzing Survey Questionnaires,” from the University of Wisconsin-Extension.
Cleaning the Data
Cleaning data and preparing it for analysis may seem like unnecessary tasks, until someone notices how skewed a report looks because a “12” was accidentally typed as “120.”
The more steps involved in collecting and transferring data, the bigger the chance for error. Therefore, cleaning should take two forms, with the goal of eliminating errors, assuring completeness, and increasing the reliability of your data.
While much of the data that markets collect may be on paper forms, it’s a good idea, when appropriate, to create systems that allow your “studied population” to enter data themselves. Volunteers, for example, can be taught to use an online form to enter in their hours and activities. This information will save automatically and can be exported to a spreadsheet format for storage and analysis. Google forms are used regularly for this kind of collection, when multiple people log hours and activities independently at regular intervals. This strategy can also be helpful when a market has volunteers (like board members) who volunteer outside of market hours and cannot access a paper sign-in form. Learn more about how to set up a free Google form here.
Checking for errors
In the field (at market or when filling out online responses), respondents may skip questions, provide a response that was not one of the response options, write illegibly, or simply make a mistake in reporting an estimated number. In the case of intercept surveys or tallies, data collectors might also make mistakes despite their best efforts at accuracy.
First, cleaning should take place at the time when the surveys, forms, and tally sheets are gathered. The people responsible for entering the data into a database should review all original surveys or tally sheets to identify potential errors and highlight them. If they notice that a visitor count tally sheet includes a noticeable outlier, such as the one below, they could check with the data collector to find out if they really meant to write 80 instead of 800 for the third hour count:
Entry Point #2
- First hour sample (20 minutes): 80
- Second hour sample (20 minutes): 65
- Third hour sample (20 minutes): 800
- Fourth hour sample (20 minutes): 70
In the case of anonymous surveys, this type of clarification is not possible. A decision must be made as to whether to discard the survey that contains the unlikely data. Surveys, forms, and other original documents should be reviewed, and the following questions asked:
- Are the responses legible/readable?
- Are all of the important questions answered?
- Are the responses complete?
- Is the relevant contextual information included (date, time, location, and name of data collector)?
- Is there a reason to believe that the data collector or respondent made a mistake, misinterpreted the question, or transposed numbers?
Reviewing the raw data with these questions in mind before actually typing it into a database gives you an opportunity to flag questionable items for follow-up before erroneous data makes its way into the “permanent record.” [See also “Missing Values” below and some suggestions for dealing with them.]
Missing Values on Surveys
It is not unusual on paper surveys for respondents to skip questions, either intentionally or by accident (these are called non-responses), or to write responses that are illegible or inappropriate for a given question (these are called ineligible responses). If the respondent or data collector cannot be contacted for clarification, these non-responses and ineligible responses are treated as missing values.
Let’s explore two “missing values” scenarios:
- On the annual vendor renewal form, a farmer skipped the question asking how far in miles his/her primary point of production is from the market. Assuming that the farmer has provided all identifying information, you can follow up in person or over the phone. You could also use Google maps to identify the shortest driving distance between the two points. If, for whatever reason, the distance cannot be identified, you should treat this item as a missing value.
- On an anonymous vendor sales slip, a comedian-farmer wrote “alligator” in the $_____ field provided for entering total gross sales for the day. This response should also be treated as a missing value.
When encountering missing values, you must flag them appropriately and subtract them from the total number of responses received. This procedure distinguishes between “0 miles” and a missing value. Treating a missing value as a zero would count it in the overall tally and inaccurately skew the average distance downward.
Using FMC’s Sample Workbook
This unit has a companion Excel workbook to help simplify data entry and management. It focuses on the ten metrics used throughout these training materials and can be opened in Excel, Google Drive, or most other spreadsheet programs. Many of the workbook sheets, or tabs, include formulas that automatically sum the season’s data points and create averages where appropriate. Below is a brief walk-through of each tab to familiarize you with the sample database.
Optional Database Tools
Tracking Vendor Attendance
Nearly every market has some kind of system for documenting which vendors are present on any given market day. Because some metrics include the number of vendors or number of days as a variable, the workbook features a Vendor Attendance tab as a “control sheet.” Entering the number of vendors each market day in this tab will feed data into other parts of your database, so that the date and number of vendors will not need to be entered more than once. Although it is not an essential component of the tool, it should help organize this simple and fundamental information that is a starting point for understanding a market’s metrics. Rows for 50 vendors are provided. For markets with more than 50 vendors, highlight row 58, right-click, and select “Insert.” Re-label the Vendor ID for each additional row.
Additional Data Points
Throughout the workbook template, some column headings are shaded in a light orange color. These are optional data points that are not crucial to the collection, entry or analysis of the metrics used in these training materials, but they may offer more insight into a market’s impacts. For example, in addition to knowing how many total agricultural acres are owned, rented, or managed by a market’s vendors, it may be beneficial to understand what percentage of those acres are owned versus leased.
If not in use, these optional columns can be ignored or hidden (to hide a column, left click the very top of the column so that the entire column is highlighted. Right click and select “Hide.”)
Sorting and Filtering
This feature means that once data is entered for the whole season, it can be sorted by any one variable. For example, in the Market Sales Tab, all market days can be sorted in order of highest to lowest total sales by left-clicking the pull-down arrow under the “Total Sales” column and selecting “Sort largest to smallest.”
Similarly, data can also be filtered to show only certain entries that match certain criteria. In the Volunteer Hours Tab, for example, data can be filtered by date, name, task, or number of hours. To filter for a certain volunteer (to see how many hours he/she/they contributed throughout the year), left-click the pull-down arrow under the “Last Name” column and select the name of the person whose hours and activities you want to see. Multiple names can also be selected, allowing a filter for all board members.
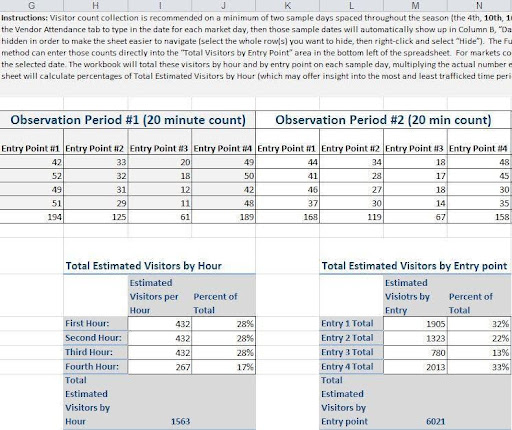
Estimated Number of Visitors
Guide 2 recommends visitor counts on a minimum of two (ideally four) sample days spaced throughout the season (for example, the 4th, 10th, 16th, and 22nd market days), though some markets regularly conduct counts on every market day. If you have used the Vendor Attendance tab to type in the date for each market day, then those sample dates will automatically show up in Column B, “Date of Count.” If not, then the dates can be entered manually, and rows representing days on which no count was conducted can be hidden in order to make the sheet easier to navigate (select the whole row(s) you want to hide, then right-click and select “Hide”).
Enter the total number of observed visitors for each 20-minute interval and each entry point along the row for the selected date. The workbook will total these visitors by hour and by entry point on each sample day, multiplying the actual number entered by three to arrive at an estimated number of total visitors per hour. When the numbers from each sample day are entered, the sheet will calculate percentages of Total Estimated Visitors by Hour (which may offer insight into the most and least trafficked time periods) and Total Estimated Visitors by Entry Point (showing trends in the use of your market’s different access points).
Figure 3.7 below shows a market using a Sample Count method instead of a Full Count method.
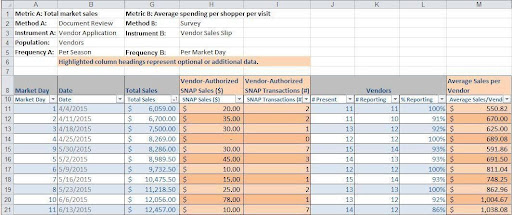
Total Market Sales
If the market dates and attendance records have been entered into the Vendor Attendance tab, they will automatically populate into the Total Market Sales tab (Columns B and I). If not, they will need to be entered manually here.
Depending on the level of detail you collect on sales by category, you can choose to enter the total reported sales for each day into Column G or unhide Columns C-F, which break sales down into Farm, Value-Added, Ready-to-Eat, and Other. To unhide and use these categories, highlight Column G, right-click, and select “Unhide.”
If any vendors at the market are authorized as SNAP retailers, SNAP sales should be reported on the Vendor Sales Slip (discussed in Guide 2). Use the optional Column to enter the total dollar value of SNAP sales and be sure that number is also added to the appropriate monthly cycle total in Tab 4.
Figure 3.8 below presents how the total market sales for the season will calculate at the bottom in a box highlighted in yellow.
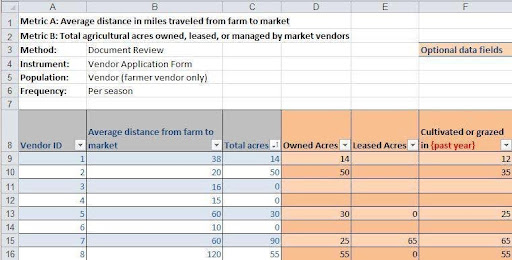
Average Distance in Miles Traveled from Farm to Market & Agricultural Acres Owned, Leased, or Managed by Market Vendors
Because these two metrics are easily collected on an annual vendor application or renewal form, they are combined into a single tab, streamlining data entry. Using the same vendor ID used in the Vendor Attendance Tab (if used), enter the average distance from point of production to market in Column B for each vendor, and proceed to enter acreage data in Column C for each agricultural vendor reporting acreage.
Some vendors will have no data to enter in Column C. Depending on the level of detail collected about acreage, Columns D-H can be hidden or used for each agricultural vendor responding with owned/leased/cultivated information. As in the Vendor Attendance Tab, rows for 50 vendors are provided. Markets with more than 50 vendors can highlight row 58, right-click, and select “Insert.”
While this training focuses on the total acres metric (Column C), all the totals and averages for additional optional data will display at the bottom. See Figure 3.9 below for a screenshot displaying that information.
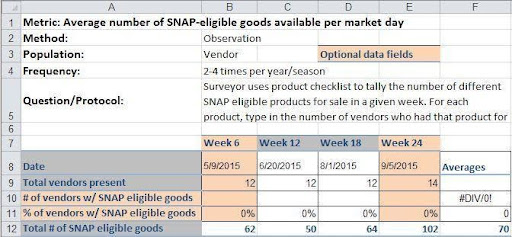
Average Number of SNAP Eligible Goods Available per Market Day
Guide 2 recommends Observation collection on four sample days spaced throughout the season (the 6th, 12th, 18th, and 24th market days). If all of the season’s market dates have been typed into the Vendor Attendance tab, those sample dates will automatically show up in Row 8, “Date.” Otherwise, they can be entered manually into this tab.
In Row 10, enter the number of vendors that were both able to accept SNAP and offered at least one SNAP-eligible product on the applicable date. This action will allow the workbook to calculate the percentage of vendors who sold at least one SNAP-eligible good, provided that the day’s vendors have been entered into the Vendor Attendance Tab.
Using the SNAP Product Checklist as a guideline will help avoid duplication (when more than one vendor has a virtually identical product). It will also create a reference for market staff or prospective vendors who want to know if and how much of a certain product is available. However, markets not interested in storing the product-by-product data can simply enter the totals from their checklists into Row 12 of this tab, under the applicable date. Figure 3.11 presents optional data fields for Average number of SNAP-eligible goods available per market day.
Transportation Methods Used by Market Visitors
Guide 2 recommends Intercept Survey collection on four sample days spaced throughout the season (the 5th, 11th, 17th, and 23rd market days). If all of the season’s market dates have been typed into the Vendor Attendance tab, those sample dates will automatically show up in Column A. For each sample day, enter the total responses per item in Column C for each survey sample day, replacing “Other: (please specify)” with any alternative method not already listed. At the bottom of the sheet, the percentages will average out over the four sample days (see Figure 3.12 below).
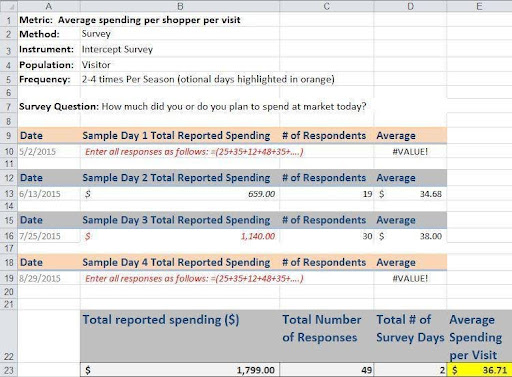
Average Spending Per Shopper Per Visit
Guide 2 recommends Intercept Survey collection on a minimum of two (preferably four) sample days spaced throughout the season (the 5th, 11th, 17th, and 23rd market days). If all of the season’s market dates have been typed into the Vendor Attendance tab, those sample dates will automatically show up in Column A.
For each sample day, create a formula by entering “=” in Column B, then typing in each numeric response separated by a “+”, making sure the string of numbers is enclosed in parentheses, as shown in red text in Figure 3.13 below.
At the bottom of the sheet, the average spending per shopper per visit will average out over the sample days.
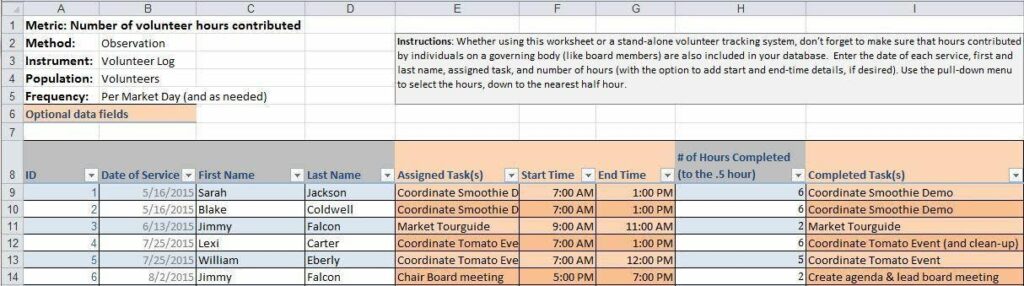
Number of Volunteer Hours Contributed
Whether using a stand-alone volunteer tracking system or this worksheet tab, you should make sure that hours contributed by individuals on a governing body, like board members, are also included in your database.
Enter the date of service, first and last name, assigned task, and number of hours (with the option to add start- and end-time details, if desired). Use the pull-down menu to select the number of hours, down to the nearest 30 minutes. Figure 3.14 presents how this metric should be entered into the worksheet.
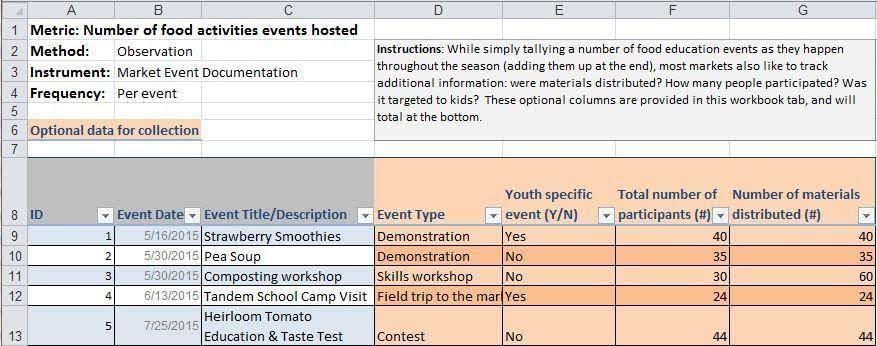
Number of Food Education Activities Hosted
Enter the event date, title, and event type into columns B, C, and D. A pull-down of sample Event Types is offered to help you categorize them later, though you can enter a different type as appropriate. If the event does not already have an official “title,” create one that is both brief and descriptive enough to be understood by anyone else using the database. Tally the number of food education events as they happen throughout the season, adding them up at the end. Most markets like to track additional information for each event. Were materials distributed? How many people participated? Was it targeted to kids? These optional columns are provided in the workbook tab, and will total at the bottom of the spreadsheet presented in Figure 3.15 below.
Worksheet Assignment
- Open the companion Data Entry Workbook or download it here.
- Enter in every market day for the current season year in the Vendor Attendance Tab.
- Choose one or more of the tabs in the companion workbook to populate with data from your market (either for the past or current season).
References
Leahy, J. (2004). Using Excel for Analyzing Survey Questionnaires. Program Development and Evaluation, University of Wisconsin-Extension. Retrieved from http://learningstore.uwex.edu/assets/pdfs/g3658-14.pdf.
Trochim, W.M.K. (2006). Research Methods Knowledge Base, 2nd Ed. Web Center for Social Research Methods at Cornell University. Retrieved from http://www.socialresearchmethods.net/kb/statprep.php.
Washington State Farmers Market Association. (2014). Market Day Transaction Form Report Summary. Farmers Market Technology Pilot Project. Retrieved from http://www.wafarmersmarkets.com/resources/technologypilotproject.html
Weiss, R. J., & Townsend, R. J. (2005). Using Excel to Clean and Prepare Data for Analysis. The Industrial-Organizational Psychologist, 42(3), pages 89-97.
https://www.siop.org/tip/backissues/Jan05/PDF/423_089to096.pdf.
West End Farmers Market. (2015). Become a Vendor. Henrico, VA. Retrieved from www.westendfarmersmarket.com/Become_a_Vendor.html.